How to Separate Header from Body in HTML in WordPress, Building a well-structured website matters most for both user experience and SEO. One of the most vital elements of web design is separating the header and body in HTML. This division enhances organization, keeps maintenance easier, and increases design flexibility.
However In this article, we will guide you through the steps of separating the header and body in HTML in a WordPress system. We’re going to also answer some frequently asked questions to assist you better understand the subject.
Also Read Out : How to get notification that someone submitted a form wordpress
Why Separate Header from Body?
Before we proceed into the instructions, we’ll explore why it’s important to separate the header from the body in HTML :
- Improved Organization: Separating the header from the body makes your code more organized and easier to read.
- Easier Maintenance: When your header is separated, you can make changes to it without affecting the rest of your page.
- Better SEO: A well-structured HTML document can improve your site’s SEO.
- Enhanced Flexibility: You can easily reuse the header across multiple pages.
How to Separate Header from Body in HTML in WordPress
Here’s a table summarizing the key files and their purposes:
| File Name | Purpose |
|---|---|
header.php | Contains the HTML code for the header |
footer.php | Contains the HTML code for the footer |
index.php | The main template file |
style.css | The stylesheet for your theme |
page.php | Template file for individual pages |
single.php | Template file for individual posts |
1. Understanding the WordPress Theme Structure
WordPress themes are made up of multiple template files. The most common ones include:
header.php: Contains the header section of your site.footer.php: Contains the footer section of your site.index.php: The main template file.style.css: The stylesheet for your theme.
2. Creating a Custom Header
In order to create a custom header section , following are the steps you have to follow :
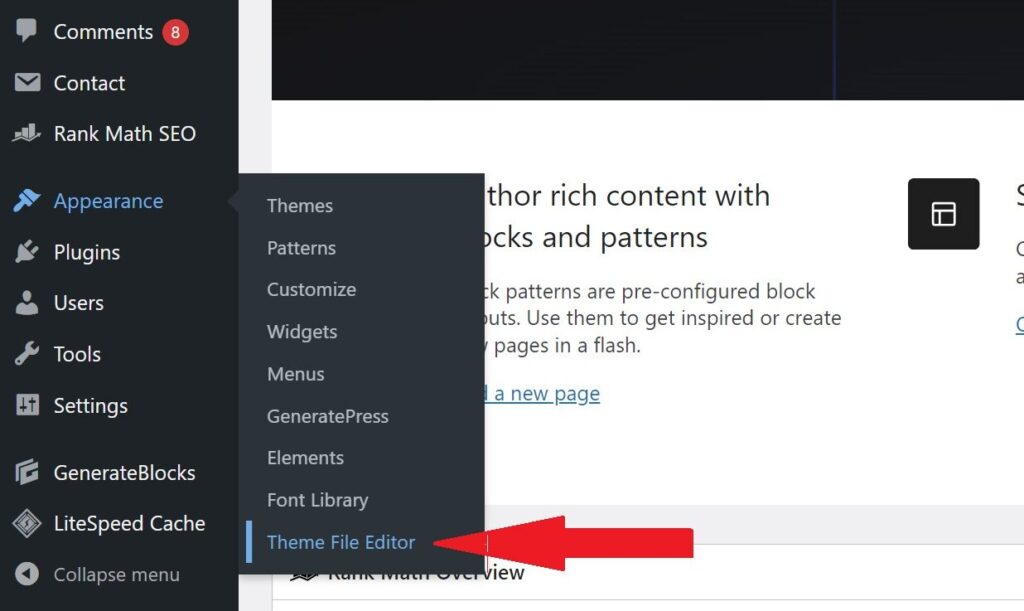
- Access Your Theme Files: Go to your WordPress dashboard, navigate to Appearance > Theme Editor. Here, you can see all the files that make up your theme.

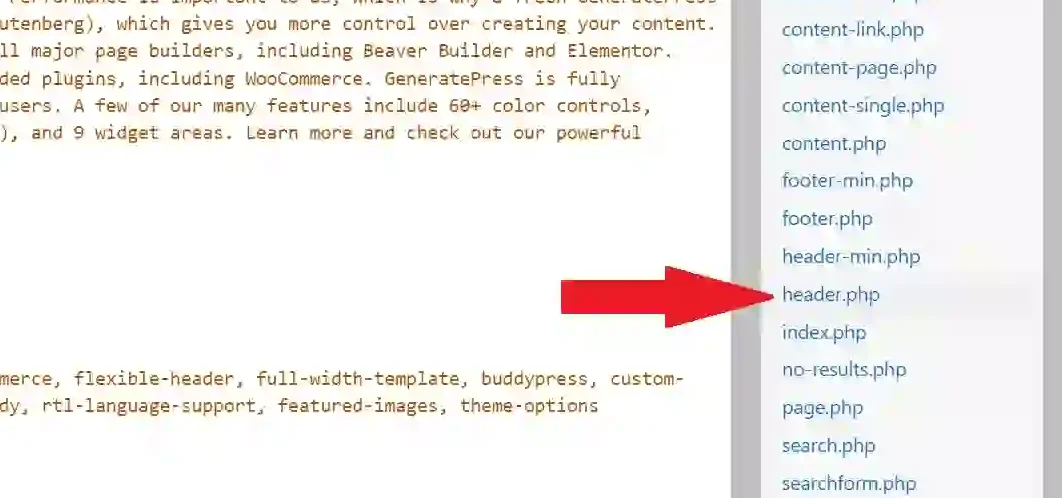
2. Locate header.php: Find and click on header.php. This file contains the HTML code for your site’s header.

3. Edit header.php: Add your custom HTML code for the header. For example:
<!DOCTYPE html>
<html <?php language_attributes(); ?>>
<head>
    <meta charset="<?php bloginfo( 'charset' ); ?>">
    <meta name="viewport" content="width=device-width, initial-scale=1">
    <link rel="profile" href="http://gmpg.org/xfn/11">
    <?php wp_head(); ?>
</head>
<body <?php body_class(); ?>>
    <header>
        <div class="site-branding">
            <h1 class="site-title"><a href="<?php echo esc_url( home_url( '/' ) ); ?>" rel="home"><?php bloginfo( 'name' ); ?></a></h1>
            <p class="site-description"><?php bloginfo( 'description' ); ?></p>
        </div>
        <nav id="site-navigation" class="main-navigation">
            <?php wp_nav_menu( array( 'theme_location' => 'menu-1' ) ); ?>
        </nav>
    </header>
3. Creating a Custom Body
The body of your HTML document is typically found in index.php or other template files like page.php or single.php. To create a custom body:
- Locate
index.php: Find and click onindex.phpin the Theme Editor. - Edit
index.php: Add your custom HTML code for the body. For example:
<?php get_header(); ?>
<div id="primary" class="content-area">
    <main id="main" class="site-main">
        <?php
        if ( have_posts() ) :
            while ( have_posts() ) : the_post();
                get_template_part( 'template-parts/content', get_post_format() );
            endwhile;
            the_posts_navigation();
        else :
            get_template_part( 'template-parts/content', 'none' );
        endif;
        ?>
    </main><!-- #main -->
</div><!-- #primary -->
<?php get_sidebar(); ?>
<?php get_footer(); ?>
4. Styling Your Header and Body
To style your header and body, you need to edit your style.css file:
- Locate
style.css: Find and click onstyle.cssin the Theme Editor. - Add Custom Styles: Add your custom CSS to style the header and body. For example:
/* Header Styles */
header {
    background-color: #f8f9fa;
    padding: 20px;
    text-align: center;
}

.site-title a {
    color: #333;
    text-decoration: none;
    font-size: 2em;
}

.site-description {
    color: #666;
}

/* Body Styles */
.content-area {
    margin: 20px;
}

.site-main {
    background-color: #fff;
    padding: 20px;
    box-shadow: 0 0 10px rgba(0,0,0,0.1);
}
5. Testing Your Changes
After making these changes, it’s important to test your site to ensure everything looks and functions as expected:
- Preview Your Site: Go to your WordPress dashboard and click on Visit Site to preview your changes.
- Check Different Pages: Make sure to check different pages and posts to ensure the header and body are displaying correctly.
- Responsive Design: Test your site on different devices to ensure it is responsive.
FAQs
1. What is the purpose of header.php in WordPress?
2. How do I add a navigation menu to my header?
3. Can I make a custom header for certain pages?
4. How can I style my header and body?
5. What is the difference between index.php and page.php?
Conclusion
Following the above steps allows you to successfully allocate the header and body in HTML within a WordPress mechanism. This section will improve the organization, maintainability, and design flexibility of your website. Happy coding!